I've spent a fair bit of time recently working on my new website, and a big part of that was making sure my images had a truly white background, so that the object appears to float on the page rather than looking like a flat photograph.
Part of that was a lot of professional photography, and part was standardising the white of my image backgrounds using GIMP, a free, open-source photo editing software similar to Photoshop. I feel I should start this post with a disclaimer: no amount of editing is going to take the place of really high quality professional photographs, and for some applications, like submitting your work for some books, you'll be asked not to edit images in any way unless you are a professional photographer. That said, it's likely that there will be circumstances where you need to or want to take photos of your work yourself, and that's where knowing how to successfully edit for white backgrounds comes in really handy.
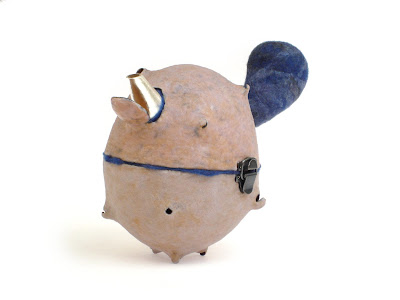
(For instance, the photo I'm using for this example is my Madeleine teapot, which I finished just before the exhibition deadline and didn't have a chance to have professionally photographed. It was shown in the Small Beautiful Objects exhibition at Self Preservation Gallery in 2008 and won the Small Beautiful Objects Award, and was sold through the exhibition, so I didn't have the opportunity to get a professional shot of it.)
So, after a bit of searching around the web, I learned how to get those really white white backgrounds that look great on screen or on paper. Here's how it's done:
Open your file with GIMP. The entire image opens as the Background layer. In the Layer menu, select Duplicate Layer to create a duplicate of the background layer.
*This means your original image is always there, sitting in behind the changes you make. Working with duplicate layers preserves the integrity of your file, and also makes it possible to return to the original, if necessary.
*You can click on the images below to see a larger version. They will open in a pop-up window on top of the main screen.

Working on the duplicate layer, click Colors, then Levels. You'll see 3 eyedropper icons in the pop-up screen - black, grey and white. Click the white eyedropper. Then click on your image background, on an area that is supposed to be white.
*You need to be working in the correct layer for your changes to take effect. Click Windows - Dockable Dialogs - Layers to open the Layer dialog box. If you find yourself in the wrong layer, just click on the desired layer in the Layer dialog box.

If the colours of your image alter when you click using the white eyedropper, click "Edit these settings as Curves" in the Levels dialog box. You can drag points on the colour curve to correct the colours.
*This whole process works best if you have the best possible starting material. Make sure your photos are shot on a white background with the best possible lighting.
Create a duplicate of this layer. Working on the new layer, choose the Fuzzy Select tool. Click to select the white background. This selection tool will select everything of a certain colour range, as long as it's touching the area you click on. So if your image is of a ring, you'll have to select the background inside the ring band separately. You can use Shift+click to add to the selection, or Ctrl+click to remove areas from the selection. If you find you're selecting too much or too little at once, change the Threshold. A Threshold around 15% works well. I recommend selecting the majority of the shadow areas as well. You can always paint these back in later, with more control.

When you have all of the background selected, click on the Paint Bucket tool. Go to the colour select box and click to reverse the colours, so that your selected foreground colour is white. To make sure you're using the whitest white, you can click on the box and enter the colour code #ffffff. This is the code for the whitest white.
Before using the Paint Bucket tool, click Fill Whole Selection. Now click anywhere in the white background to paint the whole area white.

In the Select menu, choose Select Inverse. Now the foreground (the object) is selected. Go to the colour select box and click to reverse the colours again, so that your selected foreground colour is black. Click anywhere in the foreground to paint the whole area black. You've now created a template that you'll use for your Layer Mask.

In the Select menu, choose Select All. In the Edit menu, choose Copy.
In the Layers menu, choose Create New Layer. In the pop-up box that appears, select White background.

In the Layers menu, go to Mask. Select Create Layer Mask. The default layer mask has a white background. Click OK in the pop up box.

In the Edit menu, choose Paste. In the Layers menu, choose Anchor Layer. Now the pasted selection is anchored to the Layer Mask. You'll still see just a black spot where your image was. This is your Layer Mask. It consists of a white background with a transparent hole wherever you see black. Now, to reveal your image...

Go to the Layers dialog box. See the layer below the current layer? That's the layer that you made your selections on to create a template for your Layer Mask. Click the eye next to that layer to hide it. Your image will reappear! At this stage, the edges might be a little ragged. Now it's time to refine the Layer Mask.
Select the Paintbrush tool. In the Toolbox, choose a soft-edged brush. I like to use the brush with 25% softness. Now use the slider below to make the brush very large. A good size can be up to the size of the entire object. If your image is of something narrow like a chain, make your brush about the diameter of the chain. Use this brush to edit your Layer Mask. Remember your mask is covering the background. Whatever shows as black in your mask is transparent, and the white areas are masking what's below them. Paint with black to remove areas from the mask (and reveal more of the image). Paint with white to add areas to the mask (and conceal more of the image). Here's where you can paint back in the shadows and blend them into the white background of the mask. Make sure you're working on the layer with the Layer Mask for this step.

That's it! In the File menu, click Save to save your work. This will save your file as an .xcf file (the GIMP file extension). .xcf files support layers, so everything you've done is saved, including the layers, and you can edit it again if you choose. To save as a different file extension (e.g. jpg), go to the File menu and choose Export. Your file will be flattened into one layer as a jpg, so it's always a good idea to keep both an .xcf original file and an exported .jpg file.
Got it? Now, let's speed that up: What we just went through seems like a lot of work, but it can go a whole lot faster using GIMP's built-in keyboard shortcuts. You can also assign dynamic keyboard shortcuts to whatever you want, but here's how to do all of the above using just the built-in shortcuts. Ready?
Open your file. (If you open GIMP first, you can drag and drop files onto the GIMP window.)
CRTL+SHIFT+D: Duplicate Layer.
ALT+C, then L: Open Layers dialog box.
Click on the white eyedropper.
Click on the white background.
[Open the Curves dialog box and edit curves if necessary.]
CRTL+SHIFT+D: Duplicate Layer.
Click on the Eyedropper Select tool.
Click on the white background until all of the background is selected (including inside rings, etc).
Click the Paint Bucket.
Click to reverse the black and white colour boxes to select white.
[Click Fill Whole Selection. GIMP will remember your choice, so if you're editing multiple images, you only have to do this once when you first open GIMP.]
Click on the white background to paint white.
CTRL+I: Invert selection.
Click to reverse the black and white colour boxes to select black.
Click on the foreground to paint black.
Paint your changes onto the mask.
CTRL+S: Save as .xcf file.
CTRL+SHIFT+E: Export as .jpg or other file extension.
Ta da!
Ready for publication!

So white! Madeleine teapot with integrated tea cosy
(For instance, the photo I'm using for this example is my Madeleine teapot, which I finished just before the exhibition deadline and didn't have a chance to have professionally photographed. It was shown in the Small Beautiful Objects exhibition at Self Preservation Gallery in 2008 and won the Small Beautiful Objects Award, and was sold through the exhibition, so I didn't have the opportunity to get a professional shot of it.)
So, after a bit of searching around the web, I learned how to get those really white white backgrounds that look great on screen or on paper. Here's how it's done:
Open your file with GIMP. The entire image opens as the Background layer. In the Layer menu, select Duplicate Layer to create a duplicate of the background layer.
*This means your original image is always there, sitting in behind the changes you make. Working with duplicate layers preserves the integrity of your file, and also makes it possible to return to the original, if necessary.
*You can click on the images below to see a larger version. They will open in a pop-up window on top of the main screen.

Working on the duplicate layer, click Colors, then Levels. You'll see 3 eyedropper icons in the pop-up screen - black, grey and white. Click the white eyedropper. Then click on your image background, on an area that is supposed to be white.
*You need to be working in the correct layer for your changes to take effect. Click Windows - Dockable Dialogs - Layers to open the Layer dialog box. If you find yourself in the wrong layer, just click on the desired layer in the Layer dialog box.

If the colours of your image alter when you click using the white eyedropper, click "Edit these settings as Curves" in the Levels dialog box. You can drag points on the colour curve to correct the colours.
*This whole process works best if you have the best possible starting material. Make sure your photos are shot on a white background with the best possible lighting.
Create a duplicate of this layer. Working on the new layer, choose the Fuzzy Select tool. Click to select the white background. This selection tool will select everything of a certain colour range, as long as it's touching the area you click on. So if your image is of a ring, you'll have to select the background inside the ring band separately. You can use Shift+click to add to the selection, or Ctrl+click to remove areas from the selection. If you find you're selecting too much or too little at once, change the Threshold. A Threshold around 15% works well. I recommend selecting the majority of the shadow areas as well. You can always paint these back in later, with more control.

When you have all of the background selected, click on the Paint Bucket tool. Go to the colour select box and click to reverse the colours, so that your selected foreground colour is white. To make sure you're using the whitest white, you can click on the box and enter the colour code #ffffff. This is the code for the whitest white.
Before using the Paint Bucket tool, click Fill Whole Selection. Now click anywhere in the white background to paint the whole area white.

In the Select menu, choose Select Inverse. Now the foreground (the object) is selected. Go to the colour select box and click to reverse the colours again, so that your selected foreground colour is black. Click anywhere in the foreground to paint the whole area black. You've now created a template that you'll use for your Layer Mask.

In the Select menu, choose Select All. In the Edit menu, choose Copy.
In the Layers menu, choose Create New Layer. In the pop-up box that appears, select White background.

In the Layers menu, go to Mask. Select Create Layer Mask. The default layer mask has a white background. Click OK in the pop up box.

In the Edit menu, choose Paste. In the Layers menu, choose Anchor Layer. Now the pasted selection is anchored to the Layer Mask. You'll still see just a black spot where your image was. This is your Layer Mask. It consists of a white background with a transparent hole wherever you see black. Now, to reveal your image...

Go to the Layers dialog box. See the layer below the current layer? That's the layer that you made your selections on to create a template for your Layer Mask. Click the eye next to that layer to hide it. Your image will reappear! At this stage, the edges might be a little ragged. Now it's time to refine the Layer Mask.
Select the Paintbrush tool. In the Toolbox, choose a soft-edged brush. I like to use the brush with 25% softness. Now use the slider below to make the brush very large. A good size can be up to the size of the entire object. If your image is of something narrow like a chain, make your brush about the diameter of the chain. Use this brush to edit your Layer Mask. Remember your mask is covering the background. Whatever shows as black in your mask is transparent, and the white areas are masking what's below them. Paint with black to remove areas from the mask (and reveal more of the image). Paint with white to add areas to the mask (and conceal more of the image). Here's where you can paint back in the shadows and blend them into the white background of the mask. Make sure you're working on the layer with the Layer Mask for this step.

That's it! In the File menu, click Save to save your work. This will save your file as an .xcf file (the GIMP file extension). .xcf files support layers, so everything you've done is saved, including the layers, and you can edit it again if you choose. To save as a different file extension (e.g. jpg), go to the File menu and choose Export. Your file will be flattened into one layer as a jpg, so it's always a good idea to keep both an .xcf original file and an exported .jpg file.
Got it? Now, let's speed that up: What we just went through seems like a lot of work, but it can go a whole lot faster using GIMP's built-in keyboard shortcuts. You can also assign dynamic keyboard shortcuts to whatever you want, but here's how to do all of the above using just the built-in shortcuts. Ready?
Open your file. (If you open GIMP first, you can drag and drop files onto the GIMP window.)
CRTL+SHIFT+D: Duplicate Layer.
ALT+C, then L: Open Layers dialog box.
Click on the white eyedropper.
Click on the white background.
[Open the Curves dialog box and edit curves if necessary.]
CRTL+SHIFT+D: Duplicate Layer.
Click on the Eyedropper Select tool.
Click on the white background until all of the background is selected (including inside rings, etc).
Click the Paint Bucket.
Click to reverse the black and white colour boxes to select white.
[Click Fill Whole Selection. GIMP will remember your choice, so if you're editing multiple images, you only have to do this once when you first open GIMP.]
Click on the white background to paint white.
CTRL+I: Invert selection.
Click to reverse the black and white colour boxes to select black.
Click on the foreground to paint black.
CTRL+A: Select All.
CTRL+C: Copy.
CTRL+SHIFT+N: Create New Layer.
[Click White background in the pop-up box. GIMP will remember your choice, so if you're editing multiple images, you only have to do this once when you first open GIMP.]
ALT+L, then M, then Y: Create Layer Mask.
CTRL+V: Paste.
CTRL+H: Anchor Layer.
Click the eye symbol next to the previous layer in the Layer dialog box, to hide the layer.
Click the Paintbrush tool.
[Select the soft-edged brush (25%). GIMP will remember your choice, so if you're editing multiple images, you only have to do this once when you first open GIMP.]
[Use the slider to change brush size if necessary.]Paint your changes onto the mask.
CTRL+S: Save as .xcf file.
CTRL+SHIFT+E: Export as .jpg or other file extension.
Ta da!
Ready for publication!
Fantastic Mel - thank you, will certainly look into this.
ReplyDeleteThank you for this tutorial! I'm trying this with the watercolour painting I did recently since I couldn't capture the white parts properly.
ReplyDeleteI've spent too many hours trying to find a good explanation of this, and this is the first one that I was able to really understand. Thanks so much!
ReplyDeleteThis comment has been removed by the author.
ReplyDeleteWaw! Interesting post. To work will be help Keyboard shortcut. Its will be help to first work. Background Removal Service related Keyboard shortcut will be help on photoshop.
ReplyDeleteThat's what i was looking, your explained it well. Thanks
ReplyDeleteThis was very helpful. Thank you!
ReplyDeleteGIMP is one of the best photo background remover apps. But for getting perfect shape and outcome you must to have a professional handmade background removal service
ReplyDeleteInformative post really helpful but I like to work with Photoshop. Thanks.
ReplyDeletebackground remove service
Image masking service
I Will Remove Background Of Your Image,Product,Logo And Crop It My Service :
ReplyDelete1.BACKGROUND REMOVING/CHANGING
2.Transparent background
3.Jpg/Png background
4.Amazone Product Background removing.
5.Furniture Background removing.
6.Logo Background removing.
Or any other images or products Background removing.
Extra Service,
1.Re-sizing/Cropping
2.Convert your photo into any format
3.Removing unwanted objects
4.Remove wrinkles and blemishes
5.Color correction
6.Photo merging
7.Shadow effects
MANY MORE
If your Order requirement is NOT listed above, just contact me before ordering. I will give you good solution.
I will provide you,
Unlimited revisions
100% customer satisfaction
100% Money back granted
Please Knock me First before order.
Its a really informative post..
ReplyDeleteCompress JPG Online Free
Online Compress JPG
Compress JPG Online
1) Great post
ReplyDeleteBackground Remove is my one of favorite things. I love Photoshop background remove service. I found very amazing photo edit service at PhotoEditExperts . I would be very happy if you check this incredible site.
Really Awesome Blog Thanks for Sharing.
ReplyDeleteWonderful Article on the necessity of white backgrounds in images. Really true white backgrounds make images fantastic and amazing. So, there is no alternative to Background Removal Service. Thanks for sharing the post.
ReplyDeleteWaw! Interesting message. To work will be aid Key-board faster way. Its will certainly be assistance to first job. Background removal service relevant Key-board faster way will certainly be assistance on photoshop.
ReplyDeleteGIMP is one of the best free photo editing software to edit photo.
ReplyDeleteI am also using this helpful software and feel ease to remove the background from an image.
Excellent explained here you included. thanks lot. get our some idea here
ReplyDeleteGreat. You have really done it very nicely.
ReplyDeleteIt’s a piece of good resource. I found lot of necessary information from the article. Thanks once again for sharing the article. Keep it up.
ReplyDeleteAmazing, this is a great article! I did enjoyed reading it, keep your post .
ReplyDeleteThank you so much for your amazing article.
ReplyDeleteNice post...
ReplyDeleteReally it was amazing post. Thank you for sharing with us.
ReplyDeleteI really enjoyed your blog. Thanks!! for sharing such an informative post.
ReplyDeletePhoto Editing Services | Architecture Photo Editing | Apparel Photo Editing
It is a very nice blog. Really it is a very international destination post. Thanks for sharing this post.
ReplyDeleteoutsourcing training center in Bangladesh